![RESILITE_TheMatCompany_FullColor.png]](https://info.resilite.com/hs-fs/hubfs/RESILITE_TheMatCompany_FullColor.png?height=50&name=RESILITE_TheMatCompany_FullColor.png)
Supplies that you will need before you begin:
Paint Tray & Paint Tray liners for each color
Paint Roller – Small 2-3” Width for each color
Scissors
Measure Stick or Measuring Tape
Chalk Line or Piece of Chalk
Masking Tape
Mild soap detergent
Water
Tweezers (to pick up small pieces)
Rags (white)
Use a dime or flathead screwdriver to open the paint can.
Directions to apply Logo to a Painted Resilite Wrestling Mat or Painted Liteweight Wall Padding and Kwik-stick Wall Padding
1. Read Cautions and Warnings on Paint & Solvents Can.
2. Clean the mat area where you will be applying the template with mild soap detergent & water.
Make sure that the area has no soap residue & that the mat is dry.
3. Figure out where you will be positioning the logo. Some wall mats may have a border at the top edge of the wall mat. Keep in mind to allow for that border if the wall mat has one or will be getting one. Measure the length and height of the template(s) and find the center. Some templates will be in two or more pieces. The templates will overlap by a ¼”. If you have a template in more than one piece, lie the template and align the pieces temporarily to ensure that you have the entire logo so that you find the center. Mark the template(s)’ center on the outer edges. Measure the mat to find the center of the mat section. To ensure proper alignment, chalk a guideline on the mat so that the center of the template is horizontal to the floor.
4. Lay vinyl template marked “Layer #1” against mat, aligning the centers of the template to the chalk lines. If your template is in more than one piece, start with the largest piece or the one that is marked with the center marks.
5. With the template now aligned, secure the template using masking tape. Tape the top & bottom of the template to ensure that the template doesn’t move.
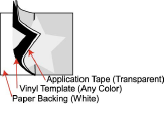
6. With the template now secured to the panel it is now time to apply the vinyl. The template is made up of three layers. The top layer
is the application tape, the middle layer is the actual vinyl template
and the bottom layer is the paper backing.
a. The first step in applying the template is to remove the bottom paper backing. To do this, carefully peel the vinyl template and application tape away from the paper backing. Start at the left edge work across the template, peel the vinyl template and application tape away from the paper, until you come over to your masking tape. Fold the vinyl template and application tape back over the right half of the template using the masking tape as a hinge. Next, cut across the exposed paper backing near the hinge and remove. Now you apply the self
 adhesive vinyl tempate to the mat. Simply, work the vinyl template and application tape back down over the mat. Make sure to keep pulling the template tight as you lay it back down to eliminate wrinkles. Using the squeegee provided, work all air bubble out from underneath starting from the center and working outward.
 B. With the left half of the template now adhered, you will need to remove the masking tape from the template. Fold the right side of the template over. Remove the paper backing. Repeat the same steps for the right half.
7. It is now time to remove the top layer of application tape. Starting at the top left corner peel the tape away until the top edge is exposed. Continue to slowly pull tape downward being careful not to pull away vinyl template from the mat. If the vinyl is not adhering to the mat while you peel the application tape, use the squeegee to press the vinyl against the mat.
8. Squeegee the entire vinyl template.
9. Check all edges of template to make sure of proper adhesion. Any wrinkles along
see any wrinkles. If the wrinkles do not flatten out, use masking tape to try to avoid paint seepage. Or if you’re careful not to cut the mat, you could also use a pocket knife to cut the vinyl edges where it creases. Overlap the pieces so that they lay flat on the mat. After a template has been applied, it cannot be entirely removed without destroying the template.
10. If your template is more than one piece, position the rest of the pieces marked
“Layer #1” against mat & overlap the template to the first adhered template by
¼”, aligning the centers of the template to the chalk lines. Try to align the
template so that the logo edges line up with each other.
11. With the template now aligned, secure the template using masking tape. Tape
the top & bottom of template to ensure that the template doesn’t move. Repeat
same steps as before.
12. If the template is more than one piece, the logo may not have matched up with
each other very well. Apply masking tape so that the jagged edges that didn’t meet perfectly will look smoother. It might be easier to pick the vinyl piece from the mat & reapply the little pieces so that they align better. After a template has been applied, it cannot be entirely removed without destroying the template.
13. It is very important to mark the mat with chalk on all of the outside corners of the applied template. This will help in applying the Second Layer in the correct position.
14. It is now time to paint the logo. a. Look at the logo layout to see if the first layer of the template will be painted with one or more colors. b. If there is more than one color, look at the template to see which areas you’ll be painting first. If two different color areas are close to each other, you may want to place some masking tape near the edges so that you don’t paint into the wrong area.
15. Open the solvent can and apply to a rag. Wipe the rag in the areas of the logo that you will be painting. This allows the mat paint to slightly become sticky so that in the future your logo will not peel. Touch the mat to see if mat is sticky.
16. Shake the can of paint. Paint will be thick. WARNING: Paint dries very quickly.
Pour paint in paint tray. Replace lid on paint can. Try to start painting as soon as possible.
17. Apply paint using a roller. To help avoid paint seepage under the template, the first coat of paint should be light – the roller should be dry. Try to roll along the edges of the letter rather than across, this will help to eliminate any chances of seepage.
18. For a second and/or third coat, put on a fairly large amount of paint.
19. If you had applied some masking tape on the template, carefully remove only the masking tape.
20. Repeat the steps 14 through 19 for every additional color of the logo. To avoid painting on freshly painted areas of the logo, let the paint dry – approximately 10-15 minutes. Lightly touch to see if paint is dry. Use a new paint tray liner & roller so that the paint won’t become polluted with the first paint color. If you only have one paint tray, pour any extra paint back into the can. Let paint tray dry & remove paint residue from the paint tray.
21. Let the paint dry slightly (approximately10 minutes). Keep a rag handy and wipe fingers often to keep from smudging panel. NOTE: Make sure that the mat has been marked with chalk of the outside corners of the template. Peel vinyl template from the mat. You may also find that a pair of tweezers will come in handy.
22. If any paint seeped under the vinyl template, use a rag with some solvents and lightly try to take paint off that had seeped. Keep using a new area of the rag so that the paint doesn’t smear. 23. If your logo requires more than one template in order to complete the logo. Look for the templates marked “Layer #2”. The mat has been marked in chalk previously by you of the position of the First Layer. Align the template marked “Layer #2” by align it exactly where the first layer had been at. The template will be marked the color to paint the mat. Repeat steps 5 – 23 until all of the layers have been adhered, painted, and peeled.